The pick-and-roll is one of the oldest and most fundamental plays in basketball. It involves one offensive player setting a screen (pick) for a teammate with the ball and then moving (rolling) toward the basket to receive a pass or create space for a more dynamic offense.
Despite its simplicity, the pick-and-roll remains one of the most, if not the most, effective plays in the game. When executed perfectly, it can be a nightmare for defenders.
Pick-and-roll is a staple at every level of basketball and serves as a cornerstone of all offensive systems. Mastering the execution of the perfect pick-and-roll is crucial for any player or team.
In this breakdown, I'll provide an in-depth guide on how to execute the perfect pick-and-roll, as well as strategies to counter various defensive screen coverages and maximize the impact of this timeless play.
Basic Pick & Roll
In a typical Pick-and-Roll, the big man sets a screen for the ball handler above the three-point line, usually at the top of the key or on the wing. The screener acts as a wall, allowing the ball handler to use it to create separation and gain an advantage.
Screener’s Responsibilities
1. Free Up the Ball Handler
The screener's primary role is to free up the ball handler with a well-executed screen. This requires holding a wide, balanced stance and making firm contact with the ball handler’s defender. It’s crucial that the screener remains stationary during the screen to avoid being called for a moving screen foul.
2. Be a Passing Option
After setting the screen, the screener should pivot toward the ball handler, positioning themselves as a viable passing option.
Timing is everything. The screener must establish the screen before the ball handler makes their move to ensure maximum effectiveness.
Ball Handler’s Responsibilities
1. Create Separation
The ball handler’s primary role is to use the screen effectively to create separation. To do this, the ball handler must set up the screen by dribbling close enough to force the defender into it. Many coaches emphasize brushing shoulders with the screener to minimize the space for the defender to slip through.
2. Make the Correct Read
Once open, the ball handler’s responsibility shifts to reading the court and making the right decision: drive, shoot, or pass based on how the defense reacts.
As with the screener, timing is everything. The ball handler must assess the defense before making a move, avoiding the temptation to rush into action without a clear read.
How to Practice the Basic Pick & Roll
Practice the Movements
Master the basic movements first. Start by walking through the pick-and-roll slowly without the ball. Focus on learning the fundamental details, including the responsibilities of both the screener and the ball handler, as discussed earlier.
Practice finding the right timing for each role, determining the proper direction to roll after the screen, and ensuring every movement is precise. Repeat these actions until they become second nature.
Once comfortable, incorporate the ball while still walking through the play. Gradually progress to running the pick-and-roll with the ball but without any defense. Next, introduce dummy defense to simulate real scenarios, and finally, transition to live 2-on-2 situations to put the skills to the test.
Separation and Brush
The screener must understand how to set a proper screen, and the ball handler must know how to use it effectively. The screener begins at the low block, makes a quick separation move, and then comes up to set the screen. Meanwhile, the ball handler sets up their defender with a quick movement such as a hesitation, in-and-out dribble, or triple-threat jab, to guide the defender into the screen. The ball handler should then brush shoulders with the screener and finish at the rim.
It’s crucial for the screener to create separation from their defender before setting the screen. Likewise, the ball handler must actively lead their defender into the screen to maximize its effectiveness. For further details and techniques on how to accomplish these, I’ll explain more later in this article.
The Pick-and-Roll Pass Drill
All the fundamental principles of 'Separation and Brush' apply here. However, instead of finishing at the rim after using the screen, the ball handler will pass to the roll man to complete the play. Following the pass, the ball handler will backpedal to the three-point line for a catch-and-shoot opportunity.
Place a cone between the three-point line and the elbow to mark where the roll man will catch the pass. The ball handler should pass immediately after using the screen, without taking an extra dribble, to disrupt the defense.
Timing is critical—make the pass half a beat earlier than usual. The roll man will typically catch the ball stationary, ready to shoot or make a quick move toward the basket
Place a cone at the elbow to practice the pocket pass. The ball handler’s aim is to lead the roll man toward the basket for a smooth scoring opportunity.
The key difference between a Pocket Pass and a Short Roll Pass is timing and positioning. The Pocket Pass finds the roll man in motion toward the basket, while the Short Roll Pass hits the roll man stationary, requiring them to make a move.
Place a cone in the middle of the paint to practice overhead or lob passes. Use misdirections, like looking away or faking a pass, to navigate the crowded paint.
The roll man should seal an imaginary defender, catch the ball with their back to the basket, and execute a strong post move to finish.
This drill reinforces the ball handler's ability to make precise, timely passes while giving the roll man varied scoring opportunities based on court positioning.
Practice the Pick & Roll Playing Live 2-on-2
Once the fundamentals are solid, transition to live 2-on-2 action. Focus on reading the defense, identifying weaknesses, and exploiting mismatches. If the screen is executed correctly, the offense should have the advantage every time.
If the offense fails to score on consecutive plays, revisit the fundamental details to identify and correct any issues. Consistent attention to these basics will ensure success in live scenarios.
Advanced Pick and Roll Concepts
How to Setup for the Pick & Roll
To execute the perfect pick-and-roll, preparation is key. It doesn’t begin when the screener sets the screen—it starts well before the screener even moves. The offensive team must position their players strategically - let's learn how:
1. How Court Spacing Elevates the Pick-and-Roll
Spacing is crucial when executing a pick-and-roll. The fewer players crowding the paint, the more opportunities open up for the attacking team. Whether you're running a 5-out, 4-out-1-in, or any other setup, it's essential that all teammates know their positions and roles clearly.
Equally important is understanding how the defense is set up. For instance, if the opposing team's rim protector is matched up with a player spotting up in the corner, they can easily rotate as the low man to protect the paint. However, if the rim protector is positioned on the wing, it becomes significantly harder for them to defend the rim.
To maximize effectiveness, the offensive team should aim to position their players strategically to pull the opponent's rim protector as far away from the basket as possible. This opens up the lane for easier scoring opportunities.
2. Separation From the On-Ball Defender
Creating space against the on-ball defender before the screen arrives is crucial. Without sufficient space, the defender can lock and trail over the screen, making it difficult to gain an advantage. To create space effectively, it’s important to keep the defender guessing. A skilled defender will constantly look for opportunities to steal the ball or disrupt the next move.
Misdirection is key to preventing the defender from reading the play or telegraphing a pass. There are two primary ways to achieve this, which we’ll explore next.
Misdirecting with Triple Threat and Dribble Moves
The simplest way to create space before dribbling is by staying in a triple-threat stance. Get low, step toward the defender’s body to create separation, and keep the ball close for control. Take full advantage of the triple-threat position to maintain unpredictability.
If you’re already dribbling, use misdirection moves to keep the defender guessing. For example, lead the defender away from the screen, making it easier for them to get caught in the screen. Make the defender believe you’re ready to drive or pass, but always maintain tight ball control to avoid giving them a chance to steal.
Misdirecting with Eye Fakes
Looking away from the screen is a simple yet effective way to misdirect the defender, who is often reading and reacting to your eyes. A couple eye fakes or even pass fakes can be enough to create the necessary separation for an effective screen action.
3. Separation From the Screen Defender
But it’s not just the ball handler who needs to focus on separation. The screener also plays a vital role in creating space from their defender to ensure the screen is set effectively and maximizes its impact.
V-Cut & Push Off
While I’ve only highlighted the V-Cut and Push-Off techniques, all off-ball separation methods for receiving the ball can be applied here. The primary goal is to ensure that the screener’s defender is delayed, making it harder for them to defend the screen action.
If the screener constantly focuses on the ball handler, it becomes too easy for the defense to anticipate the next move. To keep the defender guessing, the screener should mix things up—this could mean looking elsewhere or faking an off-ball screen before running up to set the on-ball screen. The key is to remain unpredictable and keep the defense on their toes.
Use a Quick Burst to Set the Screen
Speed alone isn’t always the answer—what truly matters is the ability to change speed. Defenders react to the offensive player’s body language; if you appear relaxed, the defender is likely to relax as well. This moment of hesitation can catch them off guard, allowing you to create the separation needed to set an effective screen.
Screen the Screener Action (Ram Screen)
Screen the Screener (STS), also known as Pick the Picker (PTP), is an excellent technique for helping the screener create separation. More specifically, an off-ball screen designed to free up the on-ball screener is referred to as a Ram Screen. Incorporating a Ram Screen into your play can significantly aid in creating separation for the screener.
This action is particularly effective against hedge or blitz defensive schemes. I’ll delve deeper into how to utilize this strategy later in the article.
4. Using Defensive Rotations to Plan Your Attack
Additionally, it’s crucial to recognize defensive rotations to plan the attack effectively. This can be achieved through pre-game scouting or by observing the defense during the first few plays. Most teams tend to stick to their rotational patterns, even if they adjust their defensive coverages.
While identifying screen coverages is important, it’s equally vital to track where the tag comes from, how the low man rotates, and when defenders react. Pay close attention to how the defense handles skip passes—can they execute an X-out in time to complete a perfect rotation?
Identify the weak points where the defense breaks down, and use that knowledge to give the offense a strategic edge.
How to Execute the Pick & Roll
Now that we’re ready to run the perfect pick-and-roll, it’s time to focus on execution. Is it difficult? Not at all—but there are a few key details to keep in mind to ensure the play is as effective as possible.
1. Use the Perfect Screen Angle
Many coaches teach players to set screens at a 45-degree angle, with their back facing the corner of the court. While this advice is generally effective for on-ball screens, it often fails to explain why the 45-degree angle works so well.
At this angle it's easy for the defender to go under the screen and recover quickly to the ball handle
If the screen is to far to the back of the defender it's very easy to go over the screen making the screen useless.
The screen at 45 degrees is set at the same angle that the attacker dribbles, therefore making going over or under the screen equally difficult, leaving no good options for the defender.
The key detail is this: regardless of whether it’s an off-ball or on-ball screen, the screener’s back should point toward the angle of attack the offensive player intends to take with their first step.
This is why 45-degree angle screens are so effective—the ball handler typically aims to follow that path during a pick-and-roll action. This positioning makes it much harder for the on-ball defender to navigate either over or under the screen, ensuring maximum efficiency for the play.
2. Ensure Screener-to-Defender Contact
As obvious as it sounds, an effective screen requires the screener to make solid contact with the on-ball defender. But here’s the detail often overlooked: it’s the ball handler’s responsibility to ensure that contact happens.
As mentioned earlier, setting up the on-ball defender with misdirection is crucial to give the screener enough time to set an effective screen. This setup ensures that when the screen arrives, the ball handler can create separation.
If the ball handler drives too early—before the screen is in position—the defender can easily avoid it. On the other hand, if the screener tries to chase the defender to ensure contact, they risk committing an illegal screen foul.
On the other hand, if the ball handler waits passively for the screen, the defender has time to anticipate the play, reducing its effectiveness. The key is for the ball handler to use misdirection to disrupt the defender’s timing, giving the screener enough time to make contact and catch the defender off guard.
3. Create Ball Handler-to-Screener Contact
When using the screen, the ball handler must make firm contact with the screener to eliminate any space for the defender to slip between them. Executed properly, this guarantees separation and consistently creates a 2-on-1 advantage.
The ball handler should approach the screen with the intensity of a shoulder check—getting low and making solid contact to break free from the defense. This aggressive, controlled movement is essential for maximizing the effectiveness of the pick-and-roll.
A Simple and Effective Pick-and-Roll Action
We’ve covered so much about what makes a pick-and-roll perfect and effective. But after all these detailed and informative discussions, it’s important to remember that the best play is often the simplest one that gets the job done.
Here, I’ve highlighted one of my favorite pick-and-roll actions. It’s incredibly simple for the ball handler yet highly effective because it simplifies the offense to a single read. This action incorporates many of the principles we’ve discussed, making it both efficient and easy to execute.
This is an incredibly simple spread Pick & Roll yet highly effective because it simplifies the offense to a single read.
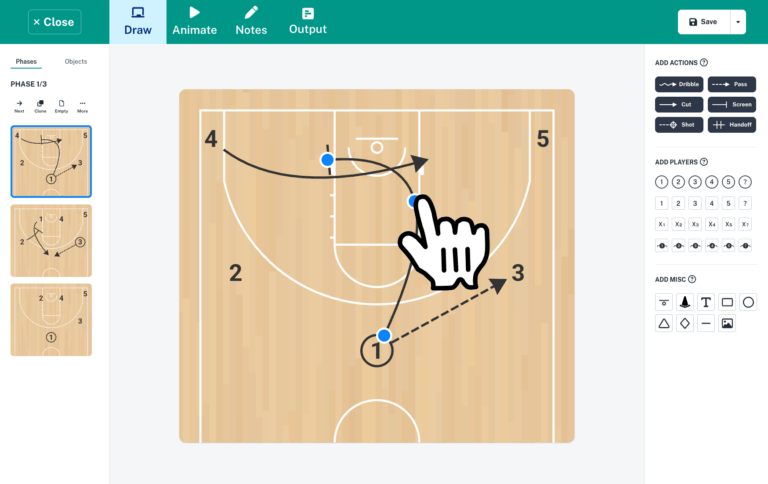
#5 comes up and sets the screen towards the side with two offensive players (#3 and #4)
- It’s crucial for the screener to roll on the single side of the court. In this case, the screener (#5) will roll on the same side as #2.
- Since the ball handler (#1) will be driving towards the double side, there’s a chance #4’s defender might stunt to slow down the drive. To counter this, #4 will set a down screen for #3, creating a simple off-ball action to keep the defense occupied.
- As the ball handler (#1) comes off the screen and the screener (#5) rolls to the basket, #2 — positioned in the single-side corner — will "lift" to the 45-degree angle. This movement forces #2’s defender to make a decision: either tag the roll man (#5) or follow #2’s lift.
If #5’s screen is effective, it creates a 2-on-1 situation, with #5’s defender guarding both #1 and #5. At this point, #1’s read becomes simple:
- If #2’s defender tags the roll man (#5), it leaves #2 open for a 3-pointer at the 45.
- If #2’s defender follows the lift, #1 can either attack the basket or dump the ball off to #5 in the 2-on-1 situation.
How to Counter Various Screen Defensive Schemes
Basketball is constantly evolving, with new tactics gaining popularity every season. While these 'counters' may not be the ultimate solution, they are designed to exploit the weaknesses in various defensive schemes and strategically attack those vulnerabilities.
Rather than simply memorizing which offensive plays counter specific defensive setups, it’s far more valuable to understand why these actions work. By grasping the underlying principles, you can adapt and apply them effectively to any situation on the court.
Pick & Roll Offense Against a Low Drop Defense
In a Low Drop coverage, the screener’s defender drops deep into the middle of the paint to prioritize protecting the rim and contesting the highest-percentage shot in basketball—the layup—while deliberately allowing the least efficient shot: the long two-pointer.
This strategy also offers additional benefits. It adheres to the defensive philosophy of "no man behind," enabling two defenders to handle the pick-and-roll without needing help from a tag man or a low man, thus keeping the rest of the defense intact.
Let's take a look at the two most popular strategies to counter the Low Drop Defense:
1. Pick and Pop
One of the most obvious—and often overused—strategies against the Low Drop is the pick-and-pop. Since the screener’s defender is positioned deep in the paint, it’s a logical counter for the screener to pop out to the three-point line or mid-range for an open shot or other scoring opportunities that arise from this option.
It’s crucial for the ball handler to be patient and allow the defense to fully commit before delivering a pass to the popper. Otherwise, the trailing defender—delayed by the screen—can quickly recover and neutralize the advantage created by the play.
If the screener is an excellent shooter, the pick-and-pop can neutralize the primary purpose of the Low Drop and force the defense to adjust their scheme entirely.
2. Set the Screen Higher
A high on-ball screen magnifies the biggest weakness of the Low Drop defense: the open spacing in the middle of the court.
By initiating the screen higher, the ball handler gains a clearer view of the floor and more time to make effective decisions, enabling a more dynamic offense.
This setup also unlocks two highly effective offensive options against the Low Drop: the pull-up three-pointer and the downhill drive.
With a high screen, the ball handler and screener have more space to build momentum when attacking downhill. While the Low Drop coverage is designed to defend against this 2-on-1 downhill attack, the added speed can make it more difficult for the defense to effectively contain the situation.
Aggressive drives to the paint not only increase scoring opportunities but can also force the rim protector into committing fouls, putting additional pressure on the defense.
As mentioned earlier, Low Drop coverage intentionally allows the least efficient shot in basketball—the long two-pointer—but only if the screen action starts near the three-point line.
By setting the screen higher than the three-point line, the ball handler can use it to dribble into a pull-up three-pointer, a far more efficient shot compared to the long two.
While the pull-up three isn’t the easiest shot in basketball, stepping into it allows the ball handler to transition smoothly into their natural shooting motion. This is a rhythm shot that most players regularly practice, making it a reliable weapon against the Low Drop.
Pick & Roll Offense Against a High Drop Defense
As teams began countering the Low Drop with a High Screen, a new defensive strategy emerged—the High Drop. This coverage addresses the spacing weaknesses of the Low Drop while continuing to protect the highest-percentage shot in basketball, the layup, through the "no man behind" defensive philosophy. Additionally, it still encourages the most inefficient shot in basketball: the long two-pointer.
However, like any defensive scheme, the High Drop is not without its vulnerabilities. There are effective ways to exploit this coverage and turn it into an advantage for the offense.
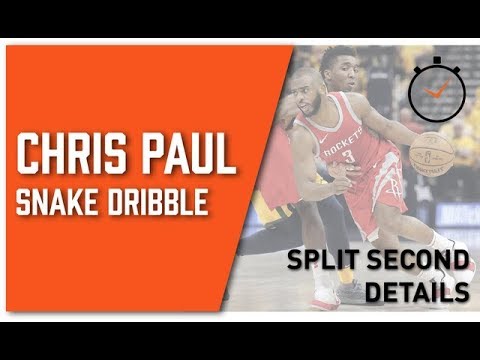
Snake Dribble
The snake dribble is a technique where the ball handler uses the screen to keep their defender—delayed by the screen—on their back by deliberately moving into the defender’s path. This forces the defender behind the play, creating an effective 2-on-1 situation and preventing them from recovering.
The High Drop coverage is designed to limit open space in the middle of the court. However, by employing the snake dribble, the ball handler can effectively stretch and utilize that space. This maneuver maximizes the available room in the middle, making it easier to create scoring opportunities for the team.
In the NBA, Chris Paul is widely regarded as a master of the snake dribble, showcasing its value at the highest level.
Quick Pocket Pass
In a High Drop coverage, the screener’s defender positions themselves on the ball handler’s driving side and backpedals as the screen action unfolds. However, if the screener’s defender overcommits to the drive, it can create a gap for the rolling screener, leaving the lane wide open for an easy finish at the rim.
However, many defenses are prepared for this play. In some cases, they may prefer allowing the big man to catch the ball on the roll and make decisions rather than letting the ball handler dictate the play. To counter the roll, the defense often involves a tag man from the weak side.
This is where the ball handler’s ability to read the defense becomes crucial. It's important to identify where the tag and the defensive rotations are coming from (as discussed in "Using Defensive Rotations to Plan Your Attack").
With this awareness, the ball handler can find open teammates in various ways—whether it’s a skip pass to the tag man’s original matchup, a fake skip pass followed by a dish to the rolling screener, or even better, a pass to the teammate whose defender is rotating to cover the tag man’s assignment.
Luka Dončić, one of the best playmakers in the current NBA, excels at making these precise reads and passes.
Pick and Pop
The concept behind using the pick-and-pop against High Drop coverage is similar to its use against Low Drop coverage, but the execution differs. In High Drop coverage, the screener’s defender naturally stays closer to the screener, making it easier for them to react and close out on the popper.
To counter this, use the pick-and-pop as a decoy and manipulate the defense. By making the defenders anticipate a pass to the popper, you can create an open driving lane for the ball handler. Combining this tactic with the previously mentioned snake dribble can further enhance the screen offense, maximizing its effectiveness.
Pick & Roll Offense vs Ice Defense
Ice defense, also referred to as "blue", "down", or "push", is designed to force the ball handler toward the sideline. Many teams prefer to set screens that allow the ball handler to attack the middle of the court, where more scoring opportunities typically arise. Ice defense counters this philosophy by having the on-ball defender jump toward the screen, leaving the ball handler with no choice but to reject it and drive toward the sideline.
This approach naturally keeps the ball handler away from other offensive options. Once the ball handler is pushed to the sideline and the screener’s defender denies the driving lane, the ball handler is often left with only one viable option: passing the ball to the screener. This is why defenses frequently employ Ice coverage against side screen actions, effectively disrupting the offense's flow.
While Ice Defense can be highly effective, it has its flaws—just like any other defensive scheme. It's important to note that Ice Defense is essentially a variation of High Drop coverage, but with forced directional control. Therefore, all the counters that work against High Drop coverage are also effective against Ice Defense.
Read the Defense (and Attack the Middle of the Court)
Defense is a promise. In Ice Defense, the screener’s defender is always positioned toward the sideline, relying on the on-ball defender’s promise to force the ball handler in that direction. But what happens if the ball handler manages to bypass the on-ball defender and drive toward the middle of the court?
If the offense manages to beat the coverage towards the middle of the court then defender #5 is out of position and we have a lot of space to attack.
Chase Action
If the on-ball defender is highly skilled and prevents the ball handler from using the screen to drive toward the middle of the paint, a simple adjustment can be made.
Have the screener pop out to the top of the key, pass the ball to them, and then chase the ball (hence the term "Chase" Action) for a handoff to create scoring opportunities in the middle of the court.
The handoff is a simple yet highly effective action because it combines a pass and a screen into one fluid motion. Additionally, it allows the offensive player to catch the ball without losing momentum, maintaining the advantage created through the handoff "screen" and enabling a seamless attack.
Pick & Roll Offense vs Weak Defense
The goal of Weak defense is straightforward: to force the ball handler toward their weaker hand.
Since the majority of players are right-handed, Weak defense typically means "forcing them left. To avoid confusion, many coaches simplify this by defining Weak as "left" and Strong as "right". It is almost always paired with Ice coverage being used for side screen actions.
No matter how skilled a player is, their dominant hand will always be more versatile than their weaker one. Forcing the ball handler to use their off-hand increases the likelihood of mistakes. Many players can finish at the rim or make basic passes with either hand, but advanced moves like skip passes, quick dribbles, or high-speed plays are often weaker with their non-dominant hand.
Weak defense aims to exploit this subtle disadvantage, slowing down the offense and disrupting their rhythm, even at the highest levels of competition.
Since Weak defense is essentially a variation of High Drop coverage, all the counters effective against High Drop also apply here. Additionally, the principles for attacking the middle of the court in Ice defense—such as the Chase action—are equally effective against Weak defense.
However, there’s one more crucial tactic to consider when countering Weak defense: the re-screen. This subtle adjustment can be a game-changer in exploiting the defense’s weaknesses.
Re-screen
The re-screening strategy isn’t limited to countering Weak defense—it’s a versatile tactic effective in many central screen actions. Coaches often purposefully set the initial screen on the ball handler’s off-hand side to force the defense to commit, then quickly flip the screen for a re-screen, allowing the ball handler to attack downhill on their dominant side.
The re-screen is particularly effective for concealing the offensive path and redirecting the ball handler to their preferred side.
Pick & Roll Offense vs Hedge Defense
Hedge defense has long been a cornerstone of screen coverage, especially against offenses that lack strong floor spacing and shooting. However, during the rise of the 5-out, small-ball style of basketball in the NBA, teams began to move away from Hedge coverage. This shift occurred because Hedge defense demands precise defensive rotations across a large area, which became increasingly difficult to execute effectively against highly spaced offenses.
To adapt, many teams turned to Drop coverage, a scheme that minimizes rotations by allowing two defenders to handle the screen action. This approach proved efficient at containing two-man actions while simplifying defensive responsibilities. However, elite ball handlers quickly learned to exploit the space afforded by Drop coverage, manipulating the defense to create high-percentage scoring opportunities.
As a result, Hedge defense is now making a resurgence in the NBA. By applying immediate pressure on the ball handler, Hedge forces them to either give up the ball early or struggle to initiate the offense effectively, disrupting the flow of the opposing team’s attack.
Short Roll Pass
A short roll occurs when the screener rolls to a position closer to the ball handler, typically around the nail area, rather than rolling all the way to the rim. This provides the ball handler, who is under pressure from the Hedge defense, with an easy passing option and keeps the offense flowing.
Having a screener who can playmake is a significant advantage, as it allows the ball handler to give up the ball while still maintaining offensive momentum. In the modern NBA, the Golden State Warriors have frequently utilized this strategy, with players like Draymond Green and Gary Payton II excelling at orchestrating the offense from the short roll.
The short roll creates opportunities for the offense to outnumber the defense, opening up various actions and offensive options, including the Chase action.
Chase Action
The principles of the Chase action remain the same as those introduced to counter Ice and Weak defenses. Its strength when used after a short roll lies in its simplicity—this action doesn’t require the screener to be an exceptional playmaker. Instead, it’s a straightforward tactic that all screeners can execute effectively without needing to make complex reads.
Escape Dribble
Using the escape dribble against Hedge defense is an effective way to create separation from the defenders while keeping the dribble alive for additional actions. Since the escape dribble typically moves away from the screener’s defender, it makes it more challenging for that defender to recover, creating space for the screener to roll effectively.
If the defense determines it’s too late to recover to their original matchups, they may opt to switch. This opens up an opportunity for the offensive team to exploit mismatches created by the switch, further enhancing their advantage.
Watch the Tag Man
As mentioned in the Quick Pocket Pass section, the tag man plays a critical role in the backline during Hedge defense. However, in this scenario, the tag man becomes even more noticeable, as the screener’s defender commits more aggressively to disrupting the ball handler’s movement. This increased commitment brings the tag man closer to the roller, making their positioning more apparent.
This closer proximity can make it easier to manipulate the defense through skip passes. For the ball handler, it’s essential to closely observe the movements of the backline defense to effectively orchestrate the offense and exploit the defensive rotations.
Split the Defenders
For Hedge defense to be effective, both the on-ball defender and the screener’s defender must be in perfect position to pressure the ball handler and make them uncomfortable. This is where the previously mentioned STS Action (Ram Screen) becomes invaluable.
By using a Ram Screen, the screener’s defender is delayed in getting to their defensive position. This gives the ball handler an opportunity to "split" between the on-ball defender and the screener’s defender, who will either be out of position or late due to the screen. While a skilled ball handler can split the defense without prior screens, this tactic is far more effective when the screener’s defender is caught off-guard and on the move—similar to why attacking a closeout is often easier than attacking a stationary defender.
Pick & Roll Offense vs Blitz Defense
Blitz defense occurs when the on-ball defender and the screener’s defender immediately trap the ball handler during the screen action. The goal is to catch the ball handler off-guard and force turnovers.
However, if the ball handler is prepared and knows how to counter Blitz defense, it can, in some ways, be easier to exploit than Hedge defense. This is because defenders are often less controlled and more aggressive when jumping out to execute the trap, creating opportunities for the offense to capitalize.
High Screen
Although it’s difficult to predict when a Blitz is coming—since it’s often called right after a timeout and rarely used in consecutive sequences—reading the play in advance can make all the difference. If the offense anticipates a Blitz, setting a high screen is crucial to maximize spacing and create wider passing angles.
When executed correctly, a Blitz makes it very challenging for the ball handler to dribble out of the trap. In such cases, quick passes become the most effective way to counter it. By maximizing court spacing, the offense benefits from wider passing lanes, and the defense is forced to cover more ground, making rotations significantly harder.
Quick Pass
Quick passes are one of the most effective ways to counter a Blitz, but the key to executing them lies in creating clear passing options. The screener must recognize the Blitz and short roll to the nearest open space, maintaining enough distance from the ball handler to avoid crowding the play while still being an available option.
The rest of the team also plays a crucial role by positioning themselves to provide additional passing outlets while preserving optimal spacing. Typically, this means players on the wings move up to the ball handler’s level, while players in the corners shift up to the wings to create passing lanes. The main objective is to move the ball quickly, exploit the defense’s temporary disadvantage, and find an open shot.
If the offense wants to keep the ball in the hands of the primary ball handler, a Chase Action followed by a handoff after the quick pass is a highly effective option.
Split the Defenders
Similar to countering Hedge defense, splitting the defense is a highly effective strategy against Blitz as well. As mentioned earlier, the Ram Screen is an excellent tool for setting up the split and creating an advantage.
Pick & Roll Offense vs Switch Defense
Switch defense is arguably the most overused strategy at the professional level, as it effectively counters offenses that rely on multiple screens within their flow. The main drawback of switching is that it often creates mismatches, but at lower levels, few players are skilled enough to fully exploit these opportunities.
At higher levels, teams mitigate this risk by deploying lineups with versatile defenders who can guard multiple positions, effectively neutralizing potential mismatches. While attacking mismatches remains a common and viable option against Switch defense, there are also other effective strategies to counter it.
Slip the Pick
A slip screen is a quick action where the screener moves as if to set a screen but doesn’t make contact with the defender, instead immediately rolling before the defense has time to establish position. This rapid movement capitalizes on the defenders’ hesitation, even for a split second.
Because the slip occurs so quickly, it often causes the defenders to be late on the switch, leaving the roll man open. Alternatively, if there’s miscommunication and both defenders commit to the roll man, the ball handler is left unguarded for an open shot.
Ghost Screen
The Ghost Screen operates on a principle similar to the Slip Screen but takes it even further. In a Ghost Screen, the player doesn’t even fully move into a screening position. Instead, the ghost screener fakes as though they might set a screen but quickly cuts past the on-ball defender and relocates to the wing or another open area.
This subtle deception creates confusion for the defense. The ghost screener’s defender often anticipates a screen and calls for a switch, but the on-ball defender, seeing no actual screen setup or contact, is left uncertain about whether to switch. This breakdown in communication frequently leaves one of the offensive players unguarded, leading to an open shot.
While not exactly the same, you can think of the Slip Screen as a "fake Pick-and-Roll" action and the Ghost Screen as a "fake Pick-and-Pop" action.
Tips for Mastering the Pick and Roll
Now that we’ve explored how to execute the perfect Pick-and-Roll and counter various defensive strategies, let’s summarize some recurring tips that are essential for mastering this fundamental basketball action.
Reading the Defense
1. Always Read the Defense
Understanding defensive positioning is critical. Pay close attention to where the on-ball defender is and which direction they are forcing the ball handler. This works in tandem with reading the screener’s defender—where are they positioned, and how can the ball handler use that information to their advantage? Recognizing these cues is the foundation of an effective Pick-and-Roll.
2. Always Watch the Tag Man
The tag man dictates the timing of the pass. Observing their movements allows the ball handler to make precise decisions. Consider their tendencies:
- Do they fully commit to the roll man?
- How far do they leave their matchup?
- What triggers their rotation to the tag?
By answering these questions, the ball handler can adjust their timing and exploit defensive weaknesses.
3. Don’t Forget About Baseline Help
Baseline help impacts how aggressively the ball handler can attack the rim. Watching the baseline help defender informs the timing and decision-making for finishing at the rim or kicking out a pass. Key considerations include:
- Where is the baseline help coming from?
- Can the ball handler manipulate the help defender into overcommitting?
- If the help commits fully, can the ball handler find their original matchup or the next rotation for a kick-out pass?
These constant reads ensure the ball handler stays one step ahead, orchestrating the defense and maintaining control over the Pick-and-Roll action.
Keep Defenders Guessing
Defenders should never feel comfortable on defense. When defenders gain confidence, it becomes much harder for the offense to execute effectively. To keep them on their heels, the offense—particularly the ball handler—must constantly keep defenders guessing.
The most effective way to achieve this is through misdirection. Whether it’s with dribble moves, eye fakes, or subtle gestures, unpredictability is key. Keeping the defense unsure of your next move can be the difference between a successful play and a failed one.
Stay Low, Make Contact, See the Floor
When using the screen, the ball handler must stay low to protect the basketball, make firm contact with the screen to force the on-ball defender to trail the play, and keep their head up to scan the court for potential opportunities.
While these may seem like basic fundamentals, they are essential and non-negotiable for any ball handler aspiring to reach an elite level. Mastering these details can make all the difference in executing a successful Pick-and-Roll.
It’s All About Angles
Screen Angles
- How will the screener position themselves to set an effective screen?
- How can the ball handler ensure the on-ball defender makes contact with the screen to maximize its impact?
Passing Angles
- What can the ball handler do to create optimal passing angles?
- How can the ball handler manipulate the defense to commit, opening up passing opportunities?
- What triggers the defenders’ reactions?
- What types of passing angles become available as a result?
Finishing Angles
- How can the ball handler maneuver the defense to create an easy finishing opportunity?
- What misdirections or movements can the ball handler use to clear the lane for a high-percentage shot?
By consistently asking these questions, the offense can find the best angles to execute plays effectively.
Speed Alone Isn’t Always the Answer
It’s the change of speed that catches the defense off-guard. By adjusting tempo, you can create mismatches, force 2-on-1 situations, and disrupt the defense’s timing, leading to easier finishes or open passing lanes.
Using variations in speed allows the ball handler to control the offense, rather than letting the defense dictate the pace. Mastering this skill is key to maintaining the upper hand.
Continuous Off-Ball Actions
When running a simple screen action, it’s easier for the defense to guard because the entire team can focus on the primary action. To counter this, keep the other defenders occupied with off-ball movements. These movements can distract the defense, potentially neutralizing tag defenders or baseline help, and create additional opportunities for the offense.

Basketball Strategy and Performance Analyst. Passionate about breaking down the game to its core, combining in-depth basketball insights with data-driven analysis to elevate understanding of the sport.