As long as I can remember, I was always a natural two-foot jumper. Maybe this is because I played a lot of volleyball when I was younger or maybe I just adopted the vertical jump technique that fits my physique best.
When it comes to basketball players, two-foot jumpers seem to be in the minority. And I completely understand why: Single-foot jumping is taught from the very beginning and comes naturally to everybody who is capable of making a simple layup.
Two-foot jumping, on the other hand, seems to be a bit more complicated for the basketball players I know. However, it's a jumping technique that allows slower and heavier players to jump as high (or even higher) than lighter, quicker, one-foot jumpers.
In the past, I have been asked a lot about how I manage to jump so high with two-feet. One reason is hard training (check out how I improved my vertical by 8 inches last summer), the other is proper jumping technique. In this blog post I want to share my best tips on how to improve your two-foot jumping technique, so that you can learn how to dunk off two-feet too!
Improve your two-feet vertical jump technique
A lot of the basketball players have serious problems with the two-foot vertical jump technique. They often lack fluidity in the transition between run-up and takeoff, which makes for awkward looking, low jumps.
You often see what I call "jump stop dunk" attempts where the athlete plants both feet simultaneously before takeoff, which usually takes away a lot of momentum and makes jumping high incredibly hard. You sometimes see NBA players perform dunks like that, but they usually have considerable jumping ability.
You can watch great examples of proper two foot vertical jump technique in indoor volleyball. As volleyball players need to jump high (instead of far), single leg jumping is useless in a lot of cases. Therefore, volleyball training focuses heavily on two-foot jumping resulting in amazing hang time (watch this video to see what I mean).
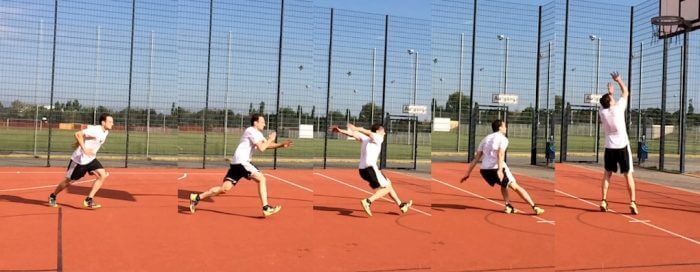
If you think want to work on your vertical jump technique, check out this step-by-step explanation of the different phases of the two-foot vertical jump:
1. Run-up
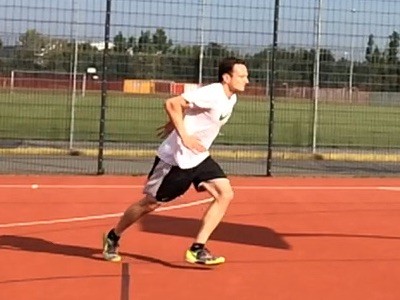
Rule of thumb: The higher the speed of your run-up the better!
However, depending on the strength of your legs and the traction of your shoes, there is a certain speed after which either your knees will buckle (because of the high forces at take-off), or your shoes will lose traction on the surface and slip.
Try to find the maximum speed that still allows you to control the takeoff. You can test different speeds for your approach and see what works best.
2. Penultimate step
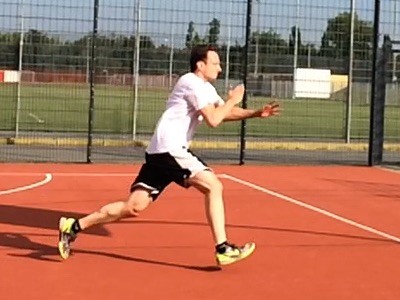
The second to last step before the jump is very important to achieve maximum jump height. This step should be longer than every other step, allowing you to lower your center of gravity and giving you more space to accelerate vertically at takeoff.
After this step, your hips will automatically be lower, allowing you the perfect angle for the takeoff.
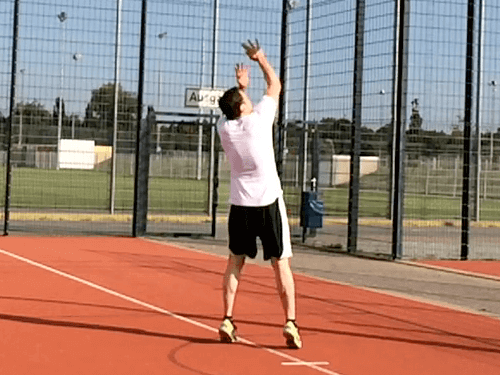
3. Arm swing
The arm swing is a critical piece of the vertical jump players often ignore or completely forget.
However, it serves two very important purposes:
- Similar to the penultimate step, the arm swing further lowers your center of gravity.
- A full arm-swing allows you to generate more upward momentum at takeoff.
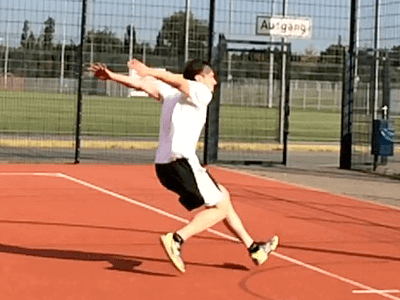
4. Planting your feet
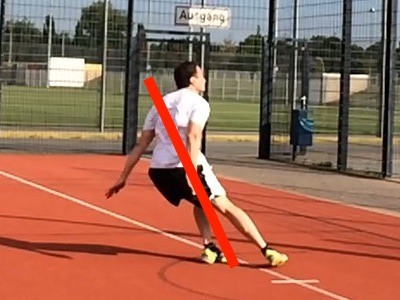
You want to plant your feet in front of your body slightly tilted towards the outside of the foot which is planted first(in my case to the left). This creates an angle allowing for the efficient transformation of horizontal speed to vertical speed.
The faster your run up, the more extreme the angle of your body will need to be (see red line in picture above). If you overdo it, however, you will not be able to control your jump and you will lose significant height.
It takes a while to get a good feel for what you can do. Your angle will also change from indoor to outdoor surfaces or from dusty floors to freshly waxed floors with maximum traction.
The amount of knee bend will depend on the type of jumper. If you are a quick and explosive jumper, you will bend your knees significantly less than if you are one who is a bit slower but compensates with strength and power.
5. Takeoff
Prior to the takeoff, the athlete tries to lower the center of gravity to allow for more distance to accelerate vertically.
At takeoff, he now tries to raise the center of mass as fast and fully as possible. We achieve this by completely extending the main three joints responsible for the vertical jump: ankles, knees, and hips.
We also complete the full arm swing to generate as much upward momentum as possible, because once our feet leave the ground, the vertical acceleration is over and our jump height is predetermined.
Conclusion
These are my best tips on how to improve your 2-foot vertical jump technique. If you feel there is room for improvement, spend a week to work on your vertical jump technique. This really make a huge difference.
If you want to learn more about two-foot jump technique and see the proper two-foot jumping in action, check out this video by Adam Folker, the creator of the Vert Shock training program:

Founder of thehoopsgeek.com. A passionate basketball enthusiast and coding geek, Andy combines a love for sports with technology.


The best tip I could offer that helped me jump 5inches higher is to feel the bounce in every step in the run up